NCM-MCI dumps VCE, NCM-MCI dumps for free
Wiki Article
DOWNLOAD the newest PassReview NCM-MCI copyright from Cloud Storage for free: https://drive.google.com/open?id=1r4oswbX8gRx4sRMRXRmRIRjxHkbMJHJE
The Nutanix NCM-MCI exam dumps will include a detailed illustration of the topics and give you enough information about them. If you want to clear the Nutanix NCM-MCI certification exam, it is important to get the Nutanix NCM-MCI Exam Material first. The NCM-MCI test material is the only way to know where you stand.
Prerequisites for Nutanix NCM-MCI Exam
Nutanix Certified Master (NCM) is the highest level of accreditation available in the Nutanix Partner Network. The NCMs are technology experts and provide strategic guidance to customers on architecting and implementing enterprise cloud solutions.
The NCM-MCI 5.15 certification proves one's skills in designing, building, managing, and supporting an enterprise cloud infrastructure using the Nutanix Enterprise Cloud OS software. This exam validates that a candidate has the expertise to perform configuration and troubleshooting of Nutanix software components at both the cluster and single node level. Nutanix NCM-MCI Exam Dumps are available for you to take the exam. A candidate for this exam should demonstrate proficiency with Nutanix Prism Central management as well as primary and secondary storage capabilities.
>> Latest NCM-MCI Dumps Files <<
Latest NCM-MCI Dumps Files High Pass-Rate Questions Pool Only at PassReview
Our Nutanix NCM-MCI exam guide has not equivocal content that may confuse exam candidates. All question points of our Nutanix Certified Master - Multicloud Infrastructure v6.10 NCM-MCI study quiz can dispel your doubts clearly. Get our Nutanix Certified Master - Multicloud Infrastructure v6.10 NCM-MCI Certification actual exam and just make sure that you fully understand it and study every single question in it by heart.
Nutanix Certified Master - Multicloud Infrastructure v6.10 Sample Questions (Q10-Q15):
NEW QUESTION # 10
Task 7
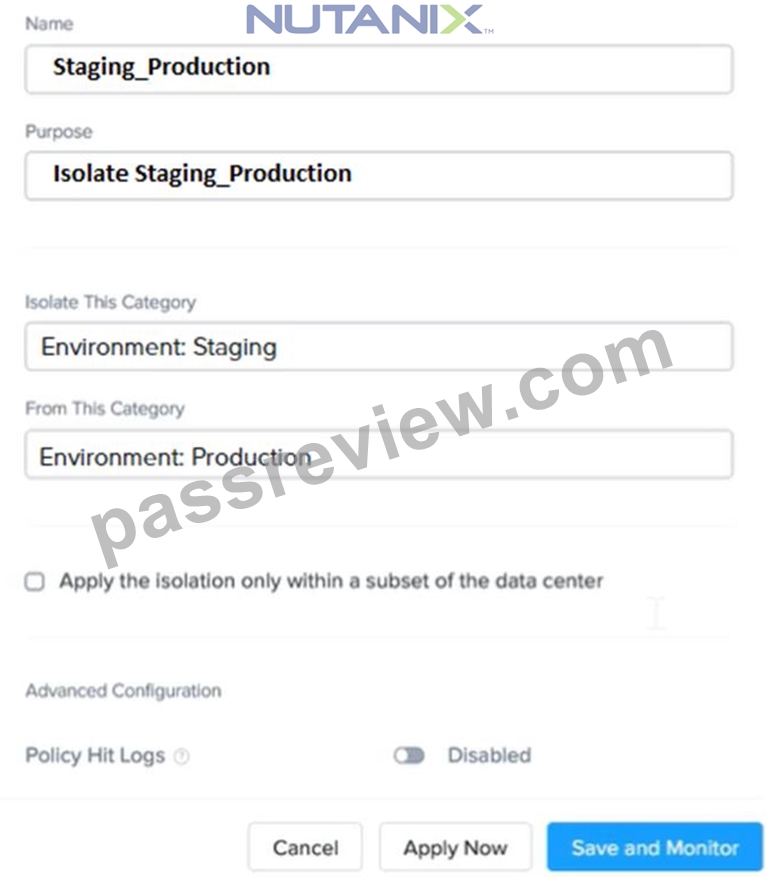
An administrator has environment that will soon be upgraded to 6.5. In the meantime, they need to implement log and apply a security policy named Staging_Production, such that not VM in the Staging Environment can communicate with any VM in the production Environment, Configure the environment to satisfy this requirement.
Note: All other configurations not indicated must be left at their default values.
Answer:
Explanation:
See the Explanation for step by step solution
Explanation:
To configure the environment to satisfy the requirement of implementing a security policy named Staging_Production, such that no VM in the Staging Environment can communicate with any VM in the production Environment, you need to do the following steps:
Log in to Prism Central and go to Network > Security Policies > Create Security Policy. Enter Staging_Production as the name of the security policy and select Cluster A as the cluster.
In the Scope section, select VMs as the entity type and add the VMs that belong to the Staging Environment and the Production Environment as the entities. You can use tags or categories to filter the VMs based on their environment.
In the Rules section, create a new rule with the following settings:
Direction: Bidirectional
Protocol: Any
Source: Staging Environment
Destination: Production Environment
Action: Deny
Save the security policy and apply it to the cluster.
This will create a security policy that will block any traffic between the VMs in the Staging Environment and the VMs in the Production Environment. You can verify that the security policy is working by trying to ping or access any VM in the Production Environment from any VM in the Staging Environment, or vice vers a. You should not be able to do so.

NEW QUESTION # 11
Task 2
An administrator needs to configure storage for a Citrix-based Virtual Desktop infrastructure.
Two VDI pools will be created
Non-persistent pool names MCS_Pool for tasks users using MCS Microsoft Windows 10 virtual Delivery Agents (VDAs) Persistent pool named Persist_Pool with full-clone Microsoft Windows 10 VDAs for power users
20 GiB capacity must be guaranteed at the storage container level for all power user VDAs The power user container should not be able to use more than 100 GiB Storage capacity should be optimized for each desktop pool.
Configure the storage to meet these requirements. Any new object created should include the name of the pool(s) (MCS and/or Persist) that will use the object.
Do not include the pool name if the object will not be used by that pool.
Any additional licenses required by the solution will be added later.
Answer:
Explanation:
See the Explanation for step by step solution
Explanation:
To configure the storage for the Citrix-based VDI, you can follow these steps:
Log in to Prism Central using the credentials provided.
Go to Storage > Storage Pools and click on Create Storage Pool.
Enter a name for the new storage pool, such as VDI_Storage_Pool, and select the disks to include in the pool. You can choose any combination of SSDs and HDDs, but for optimal performance, you may prefer to use more SSDs than HDDs.
Click Save to create the storage pool.
Go to Storage > Containers and click on Create Container.
Enter a name for the new container for the non-persistent pool, such as MCS_Pool_Container, and select the storage pool that you just created, VDI_Storage_Pool, as the source.
Under Advanced Settings, enable Deduplication and Compression to reduce the storage footprint of the non-persistent desktops. You can also enable Erasure Coding if you have enough nodes in your cluster and want to save more space. These settings will help you optimize the storage capacity for the non-persistent pool.
Click Save to create the container.
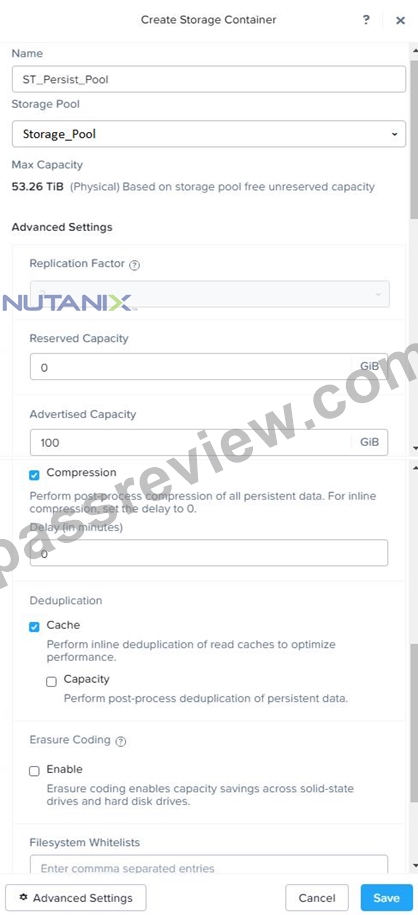
Go to Storage > Containers and click on Create Container again.
Enter a name for the new container for the persistent pool, such as Persist_Pool_Container, and select the same storage pool, VDI_Storage_Pool, as the source.
Under Advanced Settings, enable Capacity Reservation and enter 20 GiB as the reserved capacity. This will guarantee that 20 GiB of space is always available for the persistent desktops. You can also enter 100 GiB as the advertised capacity to limit the maximum space that this container can use. These settings will help you control the storage allocation for the persistent pool.
Click Save to create the container.
Go to Storage > Datastores and click on Create Datastore.
Enter a name for the new datastore for the non-persistent pool, such as MCS_Pool_Datastore, and select NFS as the datastore type. Select the container that you just created, MCS_Pool_Container, as the source.
Click Save to create the datastore.
Go to Storage > Datastores and click on Create Datastore again.
Enter a name for the new datastore for the persistent pool, such as Persist_Pool_Datastore, and select NFS as the datastore type. Select the container that you just created, Persist_Pool_Container, as the source.
Click Save to create the datastore.
The datastores will be automatically mounted on all nodes in the cluster. You can verify this by going to Storage > Datastores and clicking on each datastore. You should see all nodes listed under Hosts.
You can now use Citrix Studio to create your VDI pools using MCS or full clones on these datastores. For more information on how to use Citrix Studio with Nutanix Acropolis, see Citrix Virtual Apps and Desktops on Nutanix or Nutanix virtualization environments.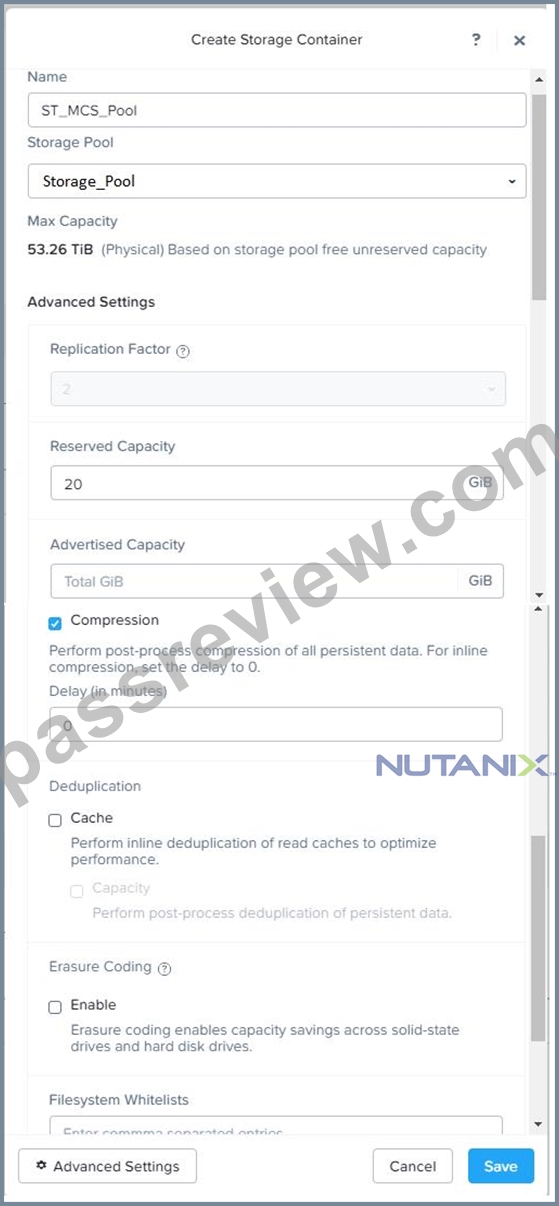
https://portal.nutanix.com/page/documents/solutions/details?targetId=BP-2079-Citrix-Virtual-Apps-and-Desktops:bp-nutanix-storage-configuration.html
NEW QUESTION # 12
Task 9
Part1
An administrator logs into Prism Element and sees an alert stating the following:
Cluster services down on Controller VM (35.197.75.196)
Correct this issue in the least disruptive manner.
Part2
In a separate request, the security team has noticed a newly created cluster is reporting.
CVM [35.197.75.196] is using the default password.
They have provided some new security requirements for cluster level security.
Security requirements:
Update the default password for the root user on the node to match the admin user password: Note: 192.168.x.x is not available. To access a node use the Host IP (172.30.0.x) from a CVM or the supplied external IP address.
Update the default password for the nutanix user on the CVM to match the admin user password.
Resolve the alert that is being reported.
Output the cluster-wide configuration of the SCMA policy to DesktopFilesoutput.txt before changes are made.
Enable the Advance intrusion Detection Environment (AIDE) to run on a weekly basis for the cluster.
Enable high-strength password policies for the cluster.
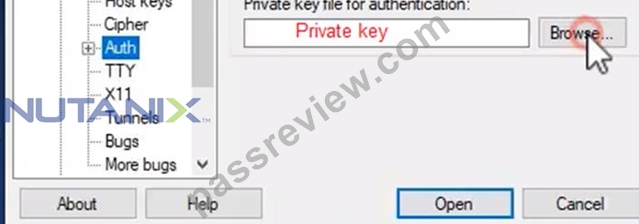
Ensure CVMs require SSH keys for login instead of passwords. (SSH keys are located in the DesktopFilesSSH folder).
Ensure the clusters meets these requirements. Do not reboot any cluster components.
Answer:
Explanation:
See the Explanation for step by step solution
Explanation:
To correct the issue of cluster services down on Controller VM (35.197.75.196) in the least disruptive manner, you need to do the following steps:
Log in to Prism Element using the admin user credentials.
Go to the Alerts page and click on the alert to see more details.
You will see which cluster services are down on the Controller VM. For example, it could be cassandra, curator, stargate, etc.
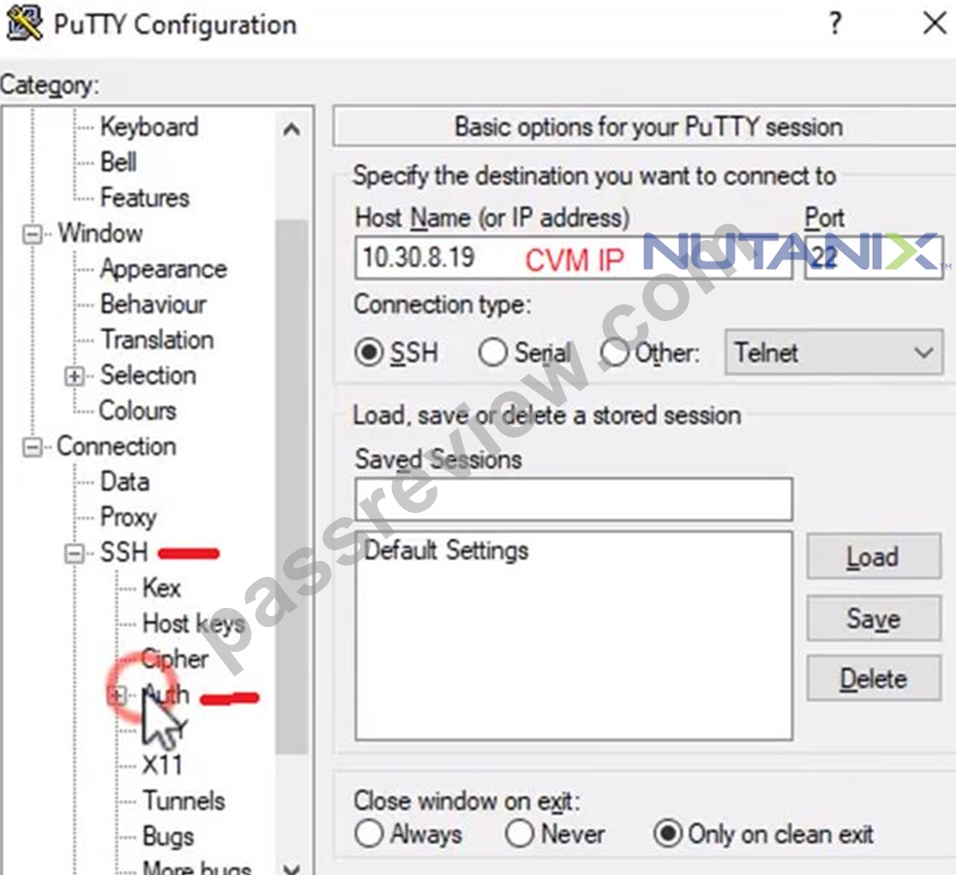
To start the cluster services, you need to SSH to the Controller VM using the nutanix user credentials. You can use any SSH client such as PuTTY or Windows PowerShell to connect to the Controller VM. You will need the IP address and the password of the nutanix user, which you can find in DesktopFilesSSH
utanix.txt.
Once you are logged in to the Controller VM, run the command:
cluster status | grep -v UP
This will show you which services are down on the Controller VM.
To start the cluster services, run the command:
cluster start
This will start all the cluster services on the Controller VM.
To verify that the cluster services are running, run the command:
cluster status | grep -v UP
This should show no output, indicating that all services are up.
To clear the alert, go back to Prism Element and click on Resolve in the Alerts page.
To meet the security requirements for cluster level security, you need to do the following steps:
To update the default password for the root user on the node to match the admin user password, you need to SSH to the node using the root user credentials. You can use any SSH client such as PuTTY or Windows PowerShell to connect to the node. You will need the IP address and the password of the root user, which you can find in DesktopFilesSSH
oot.txt.
Once you are logged in to the node, run the command:
passwd
This will prompt you to enter a new password for the root user. Enter the same password as the admin user, which you can find in DesktopFilesSSHadmin.txt.
To update the default password for the nutanix user on the CVM to match the admin user password, you need to SSH to the CVM using the nutanix user credentials. You can use any SSH client such as PuTTY or Windows PowerShell to connect to the CVM. You will need the IP address and the password of the nutanix user, which you can find in DesktopFilesSSH
utanix.txt.
Once you are logged in to the CVM, run the command:
passwd
This will prompt you to enter a new password for the nutanix user. Enter the same password as the admin user, which you can find in DesktopFilesSSHadmin.txt.
To resolve the alert that is being reported, go back to Prism Element and click on Resolve in the Alerts page.
To output the cluster-wide configuration of SCMA policy to DesktopFilesoutput.txt before changes are made, you need to log in to Prism Element using the admin user credentials.
Go to Security > SCMA Policy and click on View Policy Details. This will show you the current settings of SCMA policy for each entity type.
Copy and paste these settings into a new text file named DesktopFilesoutput.txt.
To enable AIDE (Advanced Intrusion Detection Environment) to run on a weekly basis for the cluster, you need to log in to Prism Element using the admin user credentials.
Go to Security > AIDE Configuration and click on Enable AIDE. This will enable AIDE to monitor file system changes on all CVMs and nodes in the cluster.
Select Weekly as the frequency of AIDE scans and click Save.
To enable high-strength password policies for the cluster, you need to log in to Prism Element using the admin user credentials.
Go to Security > Password Policy and click on Edit Policy. This will allow you to modify the password policy settings for each entity type.
For each entity type (Admin User, Console User, CVM User, and Host User), select High Strength as the password policy level and click Save.
To ensure CVMs require SSH keys for login instead of passwords, you need to log in to Prism Element using the admin user credentials.
Go to Security > Cluster Lockdown and click on Configure Lockdown. This will allow you to manage SSH access settings for the cluster.
Uncheck Enable Remote Login with Password. This will disable password-based SSH access to the cluster.
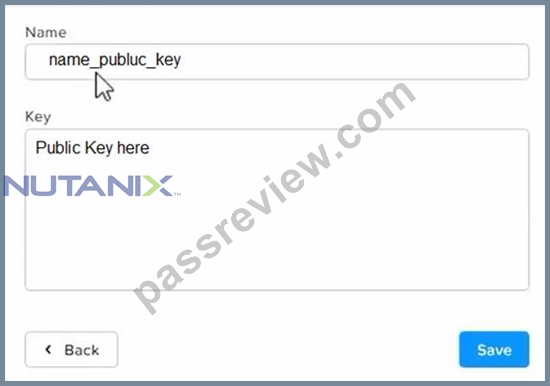
Click New Public Key and enter a name for the key and paste the public key value from DesktopFilesSSHid_rsa.pub. This will add a public key for key-based SSH access to the cluster.
Click Save and Apply Lockdown. This will apply the changes and ensure CVMs require SSH keys for login instead of passwords.
Part1
Enter CVM ssh and execute:
cluster status | grep -v UP
cluster start
If there are issues starting some services, check the following:
Check if the node is in maintenance mode by running the ncli host ls command on the CVM. Verify if the parameter Under Maintenance Mode is set to False for the node where the services are down. If the parameter Under Maintenance Mode is set to True, remove the node from maintenance mode by running the following command:
* nutanix@cvm$ ncli host edit id=<host id> enable-maintenance-mode=false You can determine the host ID by using ncli host ls.
See the troubleshooting topics related to failed cluster services in the Advanced Administration Guide available from the Nutanix Portal's Software Documentation page. (Use the filters to search for the guide for your AOS version). These topics have information about common and AOS-specific logs, such as Stargate, Cassandra, and other modules.
* Check for any latest FATALs for the service that is down. The following command prints all the FATALs for a CVM. Run this command on all CVMs.
nutanix@cvm$ for i in `svmips`; do echo "CVM: $i"; ssh $i "ls -ltr /home/nutanix/data/logs/*.FATAL"; done NCC Health Check: cluster_services_down_check (nutanix.com) Part2 Update the default password for the root user on the node to match the admin user password echo -e "CHANGING ALL AHV HOST ROOT PASSWORDS.
Please input new password: "; read -rs password1; echo "Confirm new password: "; read -rs password2; if [ "$password1" == "$password2" ]; then for host in $(hostips); do echo Host $host; echo $password1 | ssh root@$host "passwd --stdin root"; done; else echo "The passwords do not match"; fi Update the default password for the nutanix user on the CVM sudo passwd nutanix Output the cluster-wide configuration of the SCMA policy ncli cluster get-hypervisor-security-config Output Example:
nutanix@NTNX-372a19a3-A-CVM:10.35.150.184:~$ ncli cluster get-hypervisor-security-config Enable Aide : false Enable Core : false Enable High Strength P... : false Enable Banner : false Schedule : DAILY Enable iTLB Multihit M... : false Enable the Advance intrusion Detection Environment (AIDE) to run on a weekly basis for the cluster.
ncli cluster edit-hypervisor-security-params enable-aide=true
ncli cluster edit-hypervisor-security-params schedule=weekly
Enable high-strength password policies for the cluster.
ncli cluster edit-hypervisor-security-params enable-high-strength-password=true Ensure CVMs require SSH keys for login instead of passwords
https://portal.nutanix.com/page/documents/kbs/details?targetId=kA0600000008gb3CAA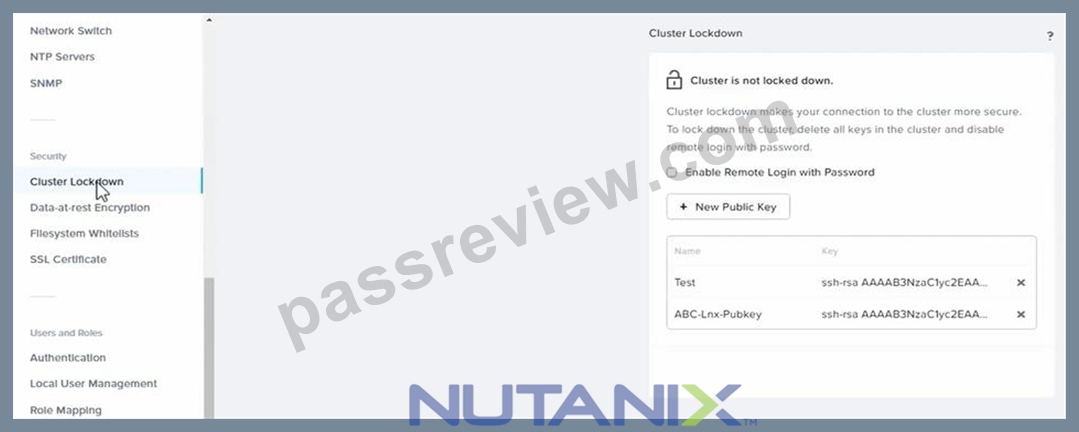
NEW QUESTION # 13
Task 13
The application team is reporting performance degradation for a business-critical application that runs processes all day on Saturdays.
The team is requesting monitoring or processor, memory and storage utilization for the three VMs that make up the database cluster for the application: ORA01, ORA02 and ORA03.
The report should contain tables for the following:
At the cluster level, only for the current cluster:
The maximum percentage of CPU used
At the VM level, including any future VM with the prefix ORA:
The maximum time taken to process I/O Read requests
The Maximum percentage of time a VM waits to use physical CPU, out of the local CPU time allotted to the VM.
The report should run on Sundays at 12:00 AM for the previous 24 hours. The report should be emailed to [email protected] when competed.
Create a report named Weekends that meets these requirements
Note: You must name the report Weekends to receive any credit. Any other objects needed can be named as you see fit. SMTP is not configured.
A: Click Next.
Click on Add to add this custom view to your report. Click Next.
Under the Report Settings option, select Weekly from the Schedule drop-down menu and choose Sunday as the day of week. Enter 12:00 AM as the time of day. Enter [email protected] as the Email Recipient. Select CSV as the Report Output Format. Click Next.
Review the report details and click Finish.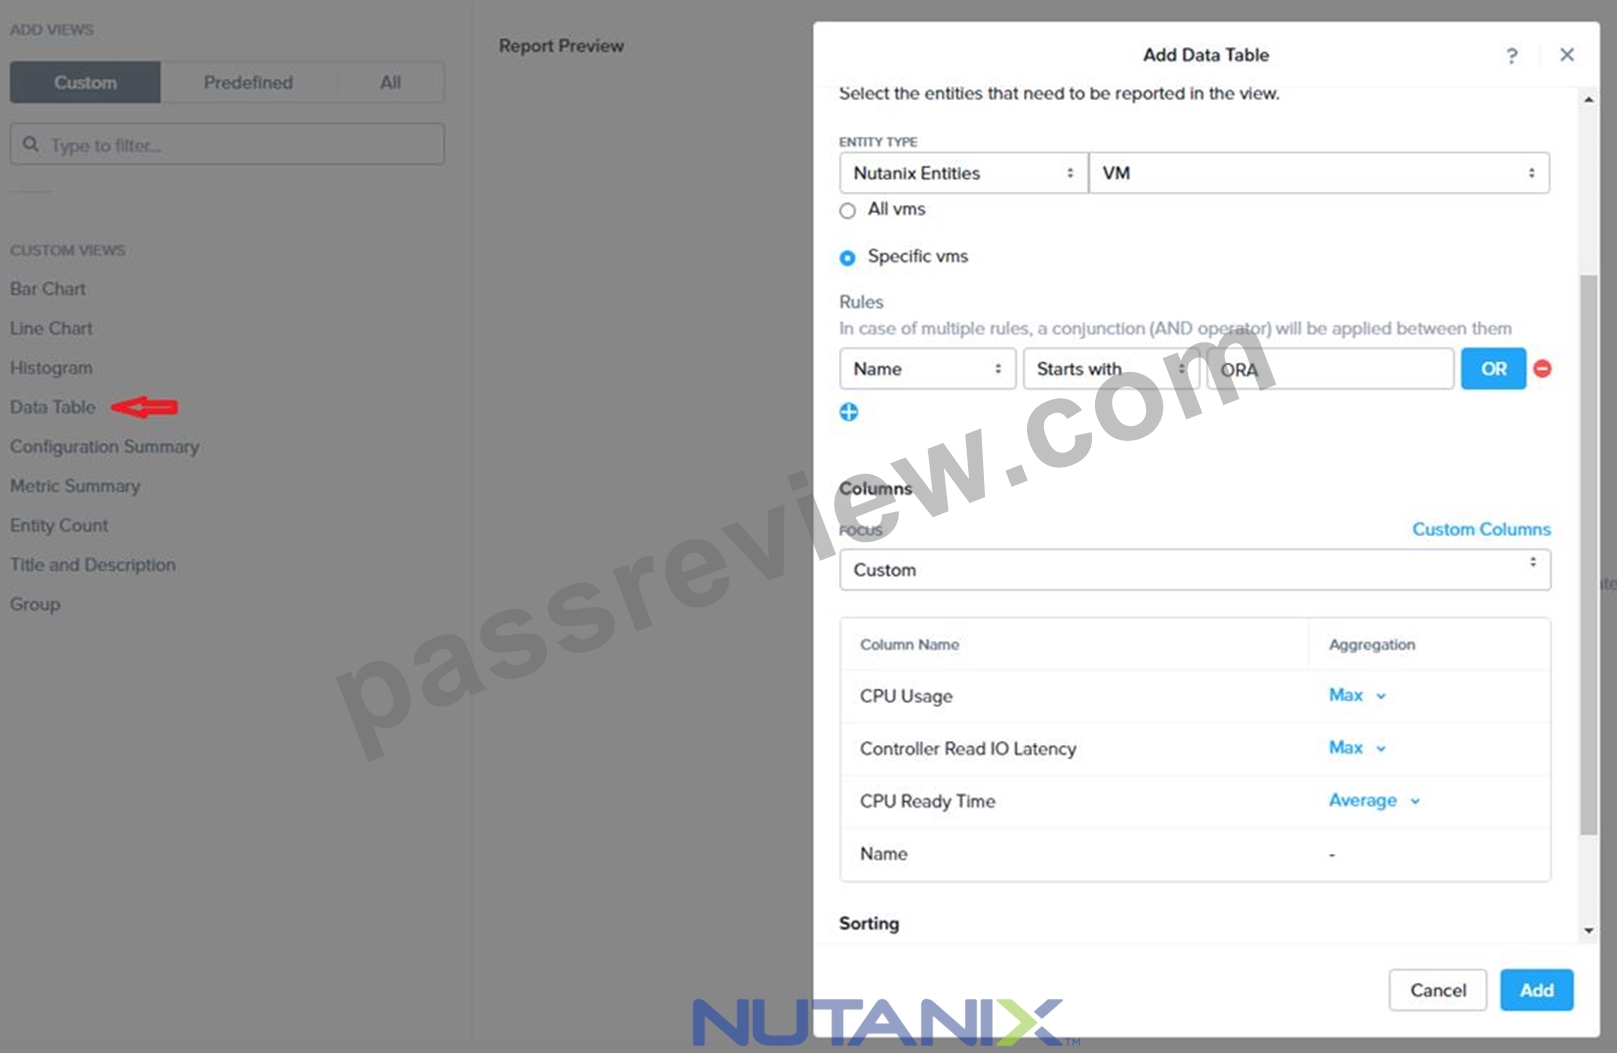
Answer:
Explanation:
See the Explanation for step by step solution
Explanation:
To create a report named Weekends that meets the requirements, you can follow these steps:
Log in to Prism Central and click on Entities on the left menu.
Select Virtual Machines from the drop-down menu and click on Create Report.
Enter Weekends as the report name and a description if required. Click Next.
Under the Custom Views section, select Data Table. Click Next.
Under the Entity Type option, select Cluster. Click Next.
Under the Custom Columns option, add the following variable: CPU Usage (%). Click Next.
Under the Aggregation option for CPU Usage (%), select Max. Click Next.
Under the Filter option, select Current Cluster from the drop-down menu. Click Next.
Click on Add to add this custom view to your report. Click Next.
Under the Custom Views section, select Data Table again. Click Next.
Under the Entity Type option, select VM. Click Next.
Under the Custom Columns option, add the following variables: Name, I/O Read Latency (ms), VM Ready Time (%). Click Next.
Under the Aggregation option for I/O Read Latency (ms) and VM Ready Time (%), select Max. Click Next.
Under the Filter option, enter ORA* in the Name field. This will include any future VM with the prefix OR
NEW QUESTION # 14
Task 8
Depending on the order you perform the exam items, the access information and credentials could change. Please refer to the other item performed on Cluster B if you have problems accessing the cluster.
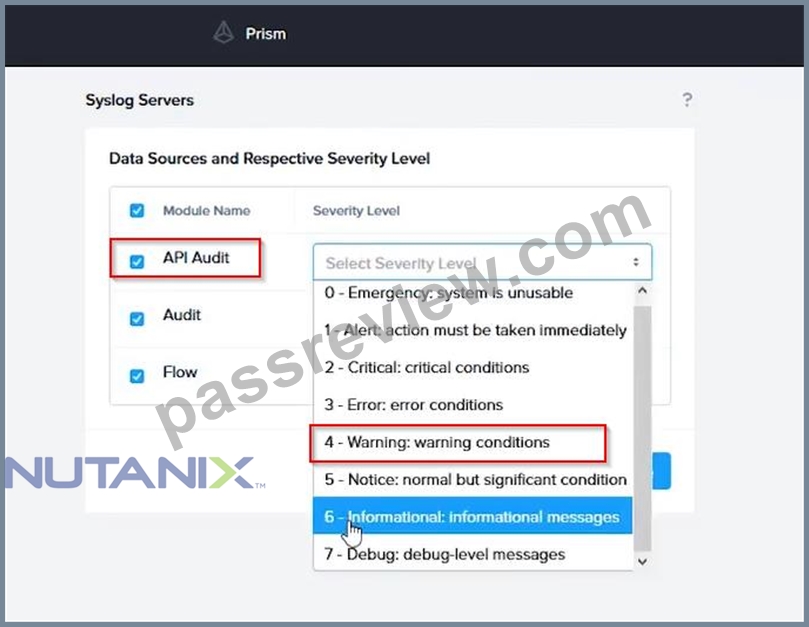
The infosec team has requested that audit logs for API Requests and replication capabilities be enabled for all clusters for the top 4 severity levels and pushed to their syslog system using highest reliability possible. They have requested no other logs to be included.
Syslog configuration:
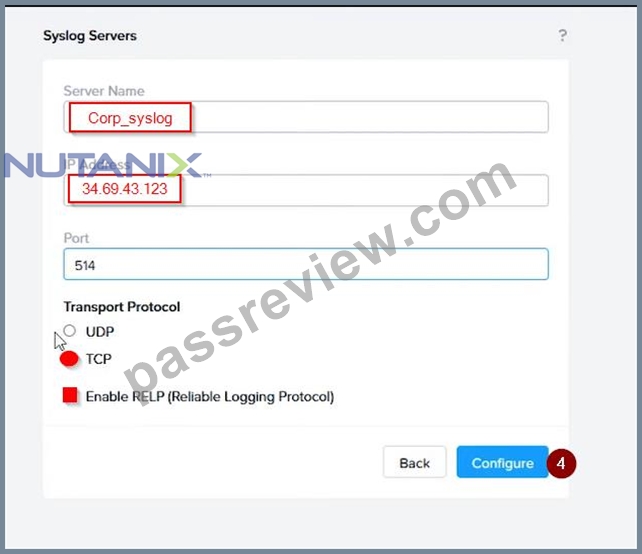
Syslog Name: Corp_syslog
Syslop IP: 34.69.43.123
Port: 514
Ensure the cluster is configured to meet these requirements.
Answer:
Explanation:
See the Explanation for step by step solution
Explanation:
To configure the cluster to meet the requirements of the infosec team, you need to do the following steps:
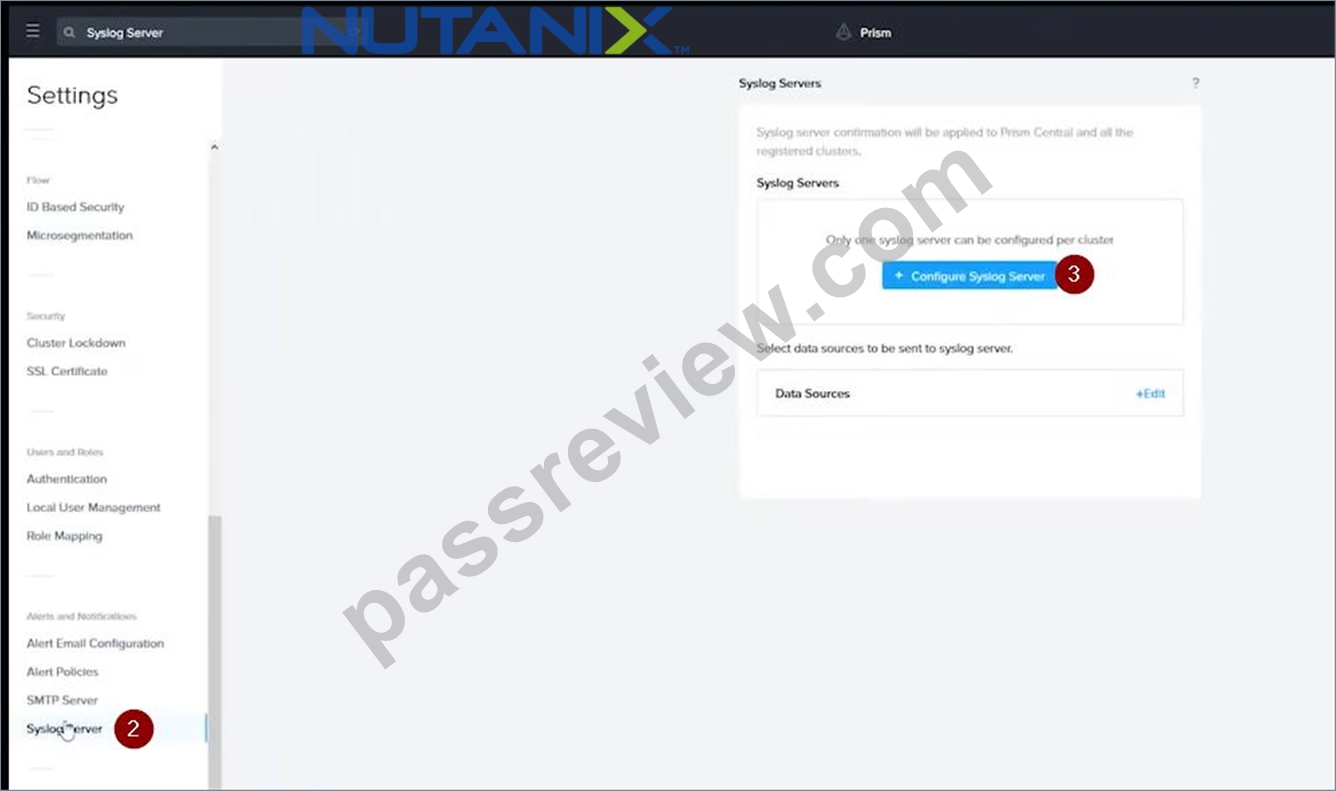
Log in to Prism Central and go to Network > Syslog Servers > Configure Syslog Server. Enter Corp_syslog as the Server Name, 34.69.43.123 as the IP Address, and 514 as the Port. Select TCP as the Transport Protocol and enable RELP (Reliable Logging Protocol). This will create a syslog server with the highest reliability possible.
Click Edit against Data Sources and select Cluster B as the cluster. Select API Requests and Replication as the data sources and set the log level to CRITICAL for both of them. This will enable audit logs for API requests and replication capabilities for the top 4 severity levels (EMERGENCY, ALERT, CRITICAL, and ERROR) and push them to the syslog server. Click Save.
Repeat step 2 for any other clusters that you want to configure with the same requirements.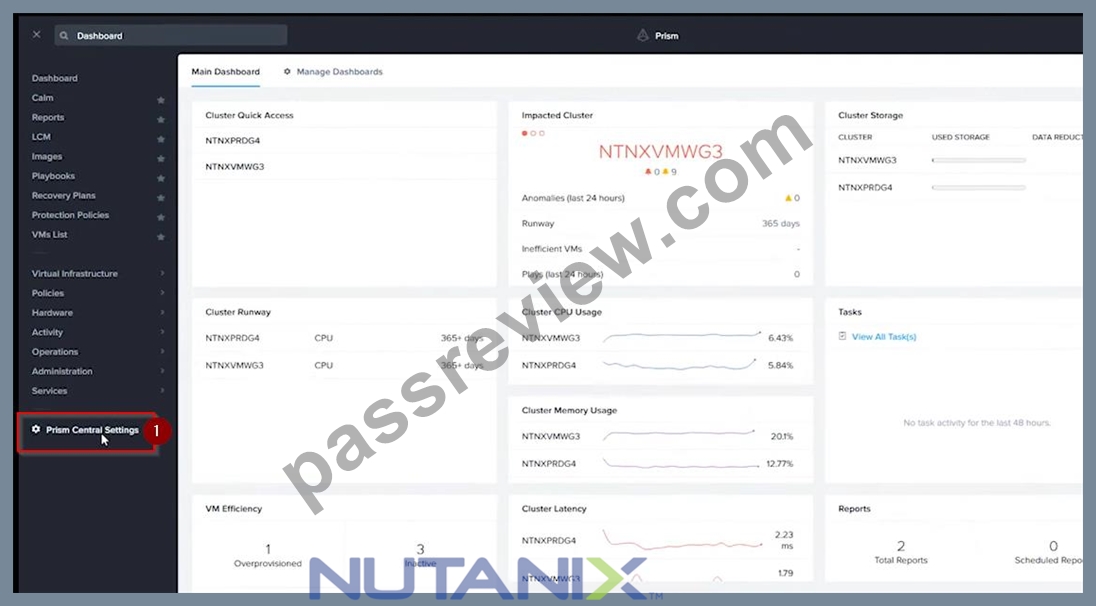
To configure the Nutanix clusters to enable audit logs for API Requests and replication capabilities, and push them to the syslog system with the highest reliability possible, you can follow these steps:
Log in to the Nutanix Prism web console using your administrator credentials.
Navigate to the "Settings" section or the configuration settings interface within Prism.
Locate the "Syslog Configuration" or "Logging" option and click on it.
Configure the syslog settings as follows:
Syslog Name: Enter "Corp_syslog" as the name for the syslog configuration.
Syslog IP: Set the IP address to "34.69.43.123", which is the IP address of the syslog system.
Port: Set the port to "514", which is the default port for syslog.
Enable the option for highest reliability or persistent logging, if available. This ensures that logs are sent reliably and not lost in case of network interruptions.
Save the syslog configuration.
Enable Audit Logs for API Requests:
In the Nutanix Prism web console, navigate to the "Cluster" section or the cluster management interface.
Select the desired cluster where you want to enable audit logs.
Locate the "Audit Configuration" or "Security Configuration" option and click on it.
Look for the settings related to audit logs and API requests. Enable the audit logging feature and select the top 4 severity levels to be logged.
Save the audit configuration.
Enable Audit Logs for Replication Capabilities:
In the Nutanix Prism web console, navigate to the "Cluster" section or the cluster management interface.
Select the desired cluster where you want to enable audit logs.
Locate the "Audit Configuration" or "Security Configuration" option and click on it.
Look for the settings related to audit logs and replication capabilities. Enable the audit logging feature and select the top 4 severity levels to be logged.
Save the audit configuration.
After completing these steps, the Nutanix clusters will be configured to enable audit logs for API Requests and replication capabilities. The logs will be sent to the specified syslog system with the highest reliability possible.
ncli
<ncli> rsyslog-config set-status enable=false
<ncli> rsyslog-config add-server name=Corp_Syslog ip-address=34.69.43.123 port=514 network-protocol=tdp relp-enabled=false
<ncli> rsyslog-config add-module server-name= Corp_Syslog module-name=APLOS level=INFO
<ncli> rsyslog-config add-module server-name= Corp_Syslog module-name=CEREBRO level=INFO
<ncli> rsyslog-config set-status enable=true
https://portal.nutanix.com/page/documents/kbs/details?targetId=kA00e0000009CEECA2
NEW QUESTION # 15
......
We will give you full refund if you fail to copyright after buying NCM-MCI exam torrent from us. We are pass guarantee and money back guarantee if you fail to copyright. And money will be returned to your payment account. In addition, NCM-MCI exam dumps are high- quality, and you can pass your exam just one time if you choose us. We offer you free update for 365 days for NCM-MCI Exam Dumps, and the latest version will be sent to your email automatically. We have online service, if you have any questions, you can have a chat with us.
NCM-MCI Questions: https://www.passreview.com/NCM-MCI_exam-copyright.html
- Gives 100% Guarantee Of Success Via Nutanix NCM-MCI Exam Questions ???? Easily obtain { NCM-MCI } for free download through ➤ www.exam4labs.com ⮘ ????Pdf NCM-MCI Exam Dump
- Pdf NCM-MCI Exam Dump ???? Exam Cram NCM-MCI Pdf ???? New NCM-MCI Test Online ???? The page for free download of 《 NCM-MCI 》 on { www.pdfvce.com } will open immediately ????NCM-MCI Test Collection
- Nutanix Certified Master - Multicloud Infrastructure v6.10 latest study torrent - NCM-MCI vce dumps - NCM-MCI practice cram ???? Download ▛ NCM-MCI ▟ for free by simply searching on { www.torrentvce.com } ????NCM-MCI Detail Explanation
- 2026 Reliable NCM-MCI – 100% Free Latest Dumps Files | NCM-MCI Questions ↘ Search for ☀ NCM-MCI ️☀️ on ➤ www.pdfvce.com ⮘ immediately to obtain a free download ????NCM-MCI Test Collection
- High-quality Latest NCM-MCI Dumps Files | Nutanix NCM-MCI Questions: Nutanix Certified Master - Multicloud Infrastructure v6.10 ???? Search on ⏩ www.practicevce.com ⏪ for ⇛ NCM-MCI ⇚ to obtain exam materials for free download ????NCM-MCI Actual copyright
- Nutanix Certified Master - Multicloud Infrastructure v6.10 latest study torrent - NCM-MCI vce dumps - NCM-MCI practice cram ???? Immediately open ▶ www.pdfvce.com ◀ and search for ⇛ NCM-MCI ⇚ to obtain a free download ????Pdf NCM-MCI Exam Dump
- Latest NCM-MCI Dumps Files | Efficient Nutanix Certified Master - Multicloud Infrastructure v6.10 100% Free Questions Ⓜ The page for free download of [ NCM-MCI ] on [ www.prep4away.com ] will open immediately ????NCM-MCI Vce Free
- Nutanix Certified Master - Multicloud Infrastructure v6.10 latest study torrent - NCM-MCI vce dumps - NCM-MCI practice cram ???? Download 《 NCM-MCI 》 for free by simply entering ➽ www.pdfvce.com ???? website ????Latest NCM-MCI Test Preparation
- Free PDF Quiz 2026 Nutanix - NCM-MCI - Latest Nutanix Certified Master - Multicloud Infrastructure v6.10 Dumps Files ???? Easily obtain ▛ NCM-MCI ▟ for free download through ➠ www.testkingpass.com ???? ????Exam Cram NCM-MCI Pdf
- NCM-MCI Detail Explanation ???? NCM-MCI Detail Explanation ???? NCM-MCI Interactive Practice Exam ???? Open ✔ www.pdfvce.com ️✔️ and search for ☀ NCM-MCI ️☀️ to download exam materials for free ????Reliable NCM-MCI copyright Ppt
- Practice NCM-MCI Exam Fee ???? Pdf NCM-MCI Exam Dump ⛳ NCM-MCI Vce Free ???? Search for [ NCM-MCI ] and easily obtain a free download on ( www.exam4labs.com ) ⛅Practice NCM-MCI Exam Fee
- maryam6409708.blogspot.com, www.stes.tyc.edu.tw, www.stes.tyc.edu.tw, barrypikf529415.wizzardsblog.com, bookmarkssocial.com, georgiadpir916586.livebloggs.com, natural-bookmark.com, lucypnoh551530.wikihearsay.com, mysitesname.com, joycejccl531241.thenerdsblog.com, Disposable vapes
P.S. Free 2026 Nutanix NCM-MCI dumps are available on Google Drive shared by PassReview: https://drive.google.com/open?id=1r4oswbX8gRx4sRMRXRmRIRjxHkbMJHJE
Report this wiki page